Innovative Garage Door Lighting Solutions
Your garage at your home in San Diego is a multifunctional space where you can park your car, work on projects or store items. Because of this, you want to have proper lighting both inside and out. This will enhance your home’s curb appeal and add some extra security to your garage and the outdoor space surrounding it. The key is to get creative so that you can stand out from other homes in your neighborhood. Overhead Garage Door Lighting You put these lights directly above the door to your garage. There are multiple styles and levels of brightness that you can choose from. Some people put one brighter light directly in the middle while others might opt for something like multiple recessed lights along the border of the underside of the roof that shine down on the door. There are LED canopy lights that give you focused and bright illumination. Some of these are adjustable so that you can choose exactly what areas should get the most light. If you want lights that are not as noticeable, you might consider flush-mounted ceiling lights. These have a modern and sleek design, and they give off even illumination. Under-Eave Lighting These lights mount to the underside of the eaves of the ceiling of your garage. This allows for a subtle and ambient glow while also fully illuminating the area. Recessed lighting in the soffit provides a seamless look. Just make sure to pick out fixtures that can highlight the garage door by having a downward angle. LED strip lights that are waterproof can go underneath the eaves. This will enhance your garage’s architectural features while providing a continuous and soft glow. Wall-Mounted Fixtures and Sconces With this lighting type, you normally put one on either side of the door. This is a more subtle and elegant garage door lighting option. Consider wall-mounted fixtures that are contemporary to add some modern flair to your garage. These should match the architectural style of your home and have clean finishes and lines. Consider a lantern-style sconce if you want a more timeless and classic look. Choose a finish that matches the exterior of your garage door. Motion Lighting Motion lighting illuminates the area, but it is also a good way to add some additional security. Once something moves into the area that the sensors reach, the lights will come on. For a higher level of security, consider flood lights. These are especially bright so that it is easy to see exactly who or what is moving in the space. For greater energy efficiency, choose LED bulbs. There are also synchronized motion sensors. These connect to different smaller lights so that when you trigger the sensor, they create a cascading effect. Solar-Powered Lights Save on energy by installing solar-powered lighting for your garage door. These lights usually have a small panel on them that collects and stores energy from the sun. If you want to use this lighting, make sure that you have adequate sunlight by your garage door so that the sun can charge the lights during the day. Solar wall lights provide soft and ambient lighting. You usually place one on either side of the garage door. They will turn on automatically at dusk. Implement some path lighting into the total lighting scheme, too. You can place these along either side of the driveway to provide additional light in the area. Since these come in a wide array of colors, shapes and themes, you can also use them for a decorative touch. Internal Window Lighting If there are windows as part of your garage door, you can integrate lighting inside the panels. This is a way to get some light while also providing a stylish and unique focal point. Built-in LED lights are common for this purpose because you get strips that you can shape to your windows. If your garage door is more of a contemporary style, this is an ideal choice since it is sleek and simple. You can also use customizable color options. Change the light colors for the seasons or even to reflect upcoming holidays. Smart Lighting Have greater control over your garage lighting with smart lights. These offer remote control, automation and customizable settings. Consider smart bulbs that you can control using voice commands or a smartphone app. You can schedule customized lighting and adjust the brightness levels. With smart outdoor lighting systems, you can change colors, program scenes and monitor energy consumption. These systems make it possible to change your garage door lighting regularly so that it is always something new and fresh. Accent Lighting If you want to add some style and flair to your garage door, consider some accent lighting. You can put this directly on the door or around it. Rope lights or LED strip lighting will outline your garage door for a modern and subtle accent. Up-lighting projects light upward since you install them at ground level. These will highlight your garage door’s architectural features. Path and Step Lighting This type of lighting should complement your main garage door lighting. It helps illuminate your driveway going up to your garage door. For example, recessed step lights sit at ground level and provide gentle illumination. These lights will not overshadow your garage door lighting, but they will work with it to make the whole area easier to see. There are also solar path markers. These help you navigate the path to your garage door since they provide subtle levels of light. Pendant Lighting If there is a porch or covered entry on your garage, you might want to use pendant lighting. This is both functional and stylish. Suspend the lights from the covered entry so that you control exactly where the illumination falls. You can also find matching pendant sets. These can match other lighting around your home and garage so that everything matches properly. You can also hang pendant lighting from the underside of the roof eaves. Just make sure that there is a beam
All About Garage Door Services
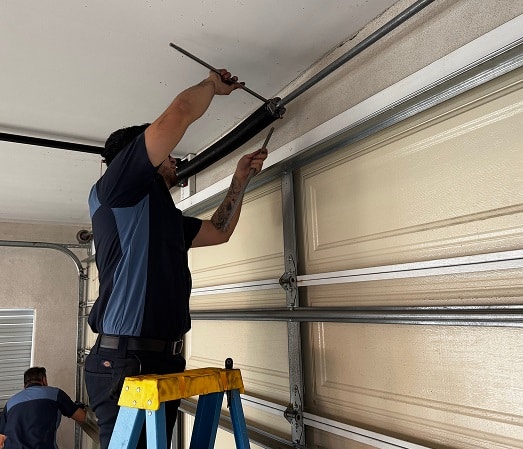
As a homeowner in the San Diego / La Jolla area, you want to ensure that your garage door is functioning properly at all times. If you’re in need of garage door repair or installation services, look no further than ADS Garage Doors & Gates. With over 40 years of experience in the industry, ADS Garage Doors & Gates is a trusted name in garage door repair and installation services. They offer a wide range of services, including but not limited to: Garage Door Installation – Whether you’re looking to replace your old garage door or install a brand new one, ADS Garage Doors & Gates can help. They offer a variety of styles and materials to choose from, including traditional, modern, and carriage house-style doors. Their team of experts can help you select the perfect door to suit your needs and budget. Garage Door Repair – A malfunctioning garage door can be a major inconvenience and even a safety hazard. If you’re experiencing issues with your garage door, such as a broken spring or cable, worn-out rollers, or a malfunctioning opener, ADS Garage Doors & Gates can help. They offer prompt and reliable repair services to ensure that your garage door is functioning properly in no time. Garage Door Maintenance – Regular maintenance is key to keeping your garage door in top condition. ADS Garage Doors & Gates offers routine maintenance services to help extend the lifespan of your door and prevent costly repairs down the line. Their maintenance services include lubrication, adjustment of springs and cables, and inspection of all components to ensure they are functioning properly. Garage Door Accessories – ADS Garage Doors & Gates also offers a variety of accessories to enhance the functionality and appearance of your garage door. They offer accessories such as keypads, remotes, and even smartphone-controlled openers to make accessing your garage easier than ever. One of the best things about working with ADS Garage Doors & Gates is their commitment to customer satisfaction. They pride themselves on providing prompt and reliable service, and their team of experts is always available to answer any questions you may have. They also offer competitive pricing and a satisfaction guarantee to ensure that you are completely satisfied with their services. In addition to their high-quality services, ADS Garage Doors & Gates is also committed to using eco-friendly products and practices whenever possible. They offer energy-efficient garage doors and openers to help reduce energy consumption and lower your utility bills. Overall, if you’re in need of garage door repair or installation services in the San Diego / La Jolla area, ADS Garage Doors & Gates is the company to call. With their years of experience, commitment to customer satisfaction, and eco-friendly practices, you can trust that your garage door is in good hands. Contact them today to schedule a consultation and get started on your garage door project.
Keep Your Liftmaster Garage Door Opener Running At Top Efficiency
As a home owner, you may often take the garage door for granted. Day after day, you press a little button to automatically open the garage door. Unfortunately, the efficiency of a garage door can go down over time. A door may open and close slower or run into bigger issues like jams. If you want to keep a garage door opener like a Liftmaster operating smoothly, then you should consider some of the following tips. The tips will keep Liftmaster openers running for years and also help with the condition of your garage door. With the help of professionals, you can ensure your garage door runs smoothly and uses less power. 1. Annual Tune-Ups Even if you use the garage door opener on a daily basis and nothing seems off, it could take a professional to notice any problems. The condition of your garage door system will also have a direct impact on the way the opener operates. For example, if you have a damaged spring or dried out rollers, then the opener will have to work even harder just to lift the door up and down. With an annual tune-up, garage door experts will inspect the door and the operational state of the opener. With a tune-up, you will enjoy a garage door open that operates at peak performance and goes up and down with ease. Proper greasing of springs and rollers will help make sure the garage door goes up and down in smooth motions. The annual tune-up also includes a focus on the opener itself. Through tests, a garage door expert can determine any performance issues and make proper adjustments as needed. The tune-up may also include the replacement of small parts so the opener operates smoothly. After the tune-up, you will learn exactly what was changed and what to look for in the future if any problems were to occur again. Not only does a tune-up help a garage door opener run better, but it will use up less power. For example, if a garage door is slow to open or close, then the motor will run for longer and use up more power. When it runs smoothly, the operation completes faster and you do not need to worry about wasting power or increases to your energy bill. 2. Surge Protection A garage door opener is typically wired directly to the garage or through an outlet installed in the ceiling of a garage. When a big storm or power surge goes through your home, you do not want to worry about the power impacting the ability for a garage door opener to operate efficiently. A power surge could damage an opener or cause glitches that makes the opener impossible to operate. If you are purchasing a new Liftmaster opener, then you could find a model with built-in surge protection. If you want to upgrade the model you already have, then you could rely on a garage door professional to add surge protection to the area. Not only will the surge protection help prevent a Liftmaster opener from any damage, but you can avoid any long-term issues that power surges cause. Along with surge protection, some newer openers also have back-up battery features built into the opener. A back-up battery will allow you to still operate the garage door in the case of a power outage. Garage doors will remain stuck in open or closed positions. Without these extra protections, your garage door and opener could go through extra wear and tear, especially during storms that constantly cause a garage door opener to turn on and off. If your opener does not have a back-up battery or surge protection, you can hire garage door professionals to install an opener that does those features. The dual-protection will go a long way in providing maximum efficiency in your opener. 3. Travel Adjustments When your garage door opener was first installed, a garage door expert likely adjusted the travel position of the opener to ensure a garage door shut smoothly. The travel adjustment on a garage door will ensure a door doesn’t get pushed too far down or stop shutting too early while creating a gap. Over time, wear and tear in an opener can impact the travel distance an opener is set too. If the garage door gets pushed down too far, then the impact could put extra pressure on a garage door opener. With some opener travel adjustments, the garage door will close more smoothly and create less wear on a garage door. It could also help prevent overuse of the garage door. For example, if you have a garage door that doesn’t shut all the way, then you may attempt to shut it multiple times before it finally touches the ground. The constant opening and shutting of the door can create a lot of wear on the opener’s motor and chain system. 4. Garage Door Uses At some homes, you may have multiple garage door bays or garages you do not use on a regular basis. While less use of a garage door opener may expand the lifetime of the opener, you should not just let a garage door opener languish and go unused. Over time, the grease and oils used on the cables, chains, and pulleys could all end up drying out. The build-up of dust and debris from a lack of use could also impact the opener. The garage door opener may not operate as efficiently and you could run into issues with jams or force the motor work extra hard to lift and close the garage door. Ideally, you want to test out the opener at least once a week or once every two weeks. This schedule will keep your garage door openers operating smoothly and help extend their life. Set calendar reminders or try to remember to open and shut the garage when you are home. Profession Garage Door Services At ADS Garage Doors & Gates, we want your garage door opener
Understanding Garage Door Springs
Like a lot of people, you might not have given a lot of thought to the springs of your garage door. You will only start looking for a solution when there is an obvious problem. The oversight doesn’t seem to make sense because the garage door springs are the most important part of the door. You shouldn’t have to wait until it is too late before you can start searching for garage door repair in San Diego. It is crucial to have an understanding of door springs because it will save you a lot in terms of repairs and maintenance down the road. There are different types of garage door springs, but they’re mostly categorized into two: torsion springs and extension springs. Extension Springs The name comes from the fact that springs store energy when they extend or stretch. More weight will be exerted on the horizontal track when the door is closed. Most garage doors are designed with two extensions. They will be located on either side of the door. The tension that is provided by each spring is independent of the other. When there is uneven distribution, the door is likely to walk up and down when it is being opened or closed. Extension springs can further be classified into opened-looped, doubled-looped, and clipped ends. Torsion Springs The number of such springs will vary depending on the type of garage door. In most instances, it will be from 1 to 4. Some of the factors that determine the number of torsion springs include weight, strength, and size of the door. The springs will be installed above the garage door opening. The weight that is exerted on the torsion springs will be equally distributed across the shaft. Torsion springs can also be further classified into different classes. Repairing the Garage Door Spring When there is an issue with the springs, it is not recommended that you attempt to do the repairs on your own. You could make things worse. The best thing to do would be to reach out to an experienced garage door technician. The person will be able to advise what needs to be done to provide a permanent fix to the problem. The fact there are many different types of garage springs will be a challenge on its own. Even when looking for a repair technician, it is crucial to know the kind of springs you have in place. This will also come in handy if you’re planning to do the repairs on your own. Why Experience Matters When Working with a Repair Technician An experienced garage door technician will know what needs to be done after examining the problem. This is something that will not be obvious when trying to do the repairs on your own. The technician will know the length and weight of the spring that is needed when it comes to replacement. Most residential garage doors are about eight feet tall. Precision is crucial when determining the door springs that are required. For more information on garage door springs, you can check out our website for more information.
Your Garage Door: When to Repair, When to Replace
What’s the expected lifespan of a garage door, and when should you start considering installing a new one rather than managing with tune-ups and repairs? Those are questions that often do not have simple answers. The materials and manufacture of your door are part of its longevity, as is the skill of its installation, the regularity of its maintenance, and the frequency of its use (number of opening and closing cycles) and possible abuse. Some parts will wear out more quickly—the torsion bars, because of the enormous tension they are under, require vigilant care and prudent replacement (you can read more about this in our blogs on torsion bars). A general rule of thumb is to expect 15 good years from a garage door, though that number can vary dramatically depending on the factors listed above. The more important things to think about, and watch for, are obvious signs of damage or wear, especially those that may make the door shimmy, vibrate, or produce sounds indicating friction or resistance. If your door has a series of operational failures, that’s an argument for replacement. Any significant bump or collision, especially with a heavy object such as a vehicle, will potentially affect the door’s lifespan. Misalignment, damaged or missing panels, and weather damage (especially dry rot on wood doors) are strong indicators that it may be time to look at a new door. Worn bearings, loose hinges, broken or loose cables, and loose screws are tell-tell signs a door needs attention, and perhaps replacement. The safety functions, such as electronic eyes that prevent door closure on people, animals, or objects, are critical and should be checked regularly. These safety features are the most important things to be attentive to. A good match between the door and the opener can extend the functioning years of your whole garage door system. If the opener is straining or underperforming, that will over time affect the entire system. Remember that any new door installation will require an opener with qualifying battery backup, to prevent problems and potential risks in the event of a power outage. Newer models are generally safer, more energy-efficient, and provide better home security than older, simpler doors, especially the basic tilt-up doors common in tract homes-built decades ago. They are also available in a broader range of insulation options and come in a surprisingly extensive array of materials, textures, colors, and appointments such as windows and decorative hardware that can match the look and design of the home. This includes matching entry or side gates. Peruse our gallery pages to see numerous examples. Every photo shown in our web galleries is an ADS Garage Doors & Gates installation—we have deep experience in custom installations, both residential and commercial. These provide a significant return on investment, which is especially important if you are anticipating selling your home in the not-to-distant future. At ADS Garage Doors & Gates we take great care to provide not only excellent, detail-oriented installation of doors, gates, and openers but regular tune-ups and emergency repairs. In most cases, responsible, regular maintenance is the best decision to extend your door’s operational lifespan. ADS Garage Doors & Gates wants you to get the best value for every dollar you spend. We’re glad to consult on these decisions and give you the best information so you can do what is best for you and your family. Repair or replace? Ultimately, that is up to you, and ideally for your reasons and within your timing.
Why Is My Garage Door Squeaking in San Diego?

A persistent squeak often occurs when a garage door opens or closes, as friction develops between its moving parts. These noises usually appear as rollers, hinges, or other garage door components begin experiencing wear, reduced lubrication, or environmental exposure. In San Diego homes, identifying the cause of the noise early helps prevent additional strain on important garage door parts. Professional garage door repair can locate the source of the squeak and restore smoother operation before the issue develops into larger mechanical concerns. Is Garage Door Squeaking a Sign of a Larger Problem? A persistent squeak can indicate that friction or wear is developing within several garage door components, which may gradually affect how the garage door moves during normal opening and closing cycles. Situations where the sound may point to developing concerns include: Friction forming between the garage door rollers and the track walls, affecting the door’s movement Wear building around hinge pivot points that allow door panels to bend during operation Changes in spring tension that shift the balance of the door system Hardware, such as brackets or loose hinges, is moving slightly during repeated cycles Friction between connected metal parts that support the door’s lifting motion Early stress developing within garage door springs or other high-tension hardware To understand how these friction points are addressed during service, read our guide on How to Stop a Garage Door From Squeaking, which explains how technicians reduce noise and restore smoother operation. Why Do Garage Doors Start Making Noise Over Time? Roller Wear and Metal Friction Constant travel along the track gradually increases friction between the garage door rollers, bearings, and surrounding metal hardware, leading to squeaking during regular operation. Watch for conditions such as: Worn roller bearings are creating resistance along the track path Aging metal rollers are producing friction against the track walls Dust buildup is collecting around the ball bearings Roller wheels are losing lubrication after years of movement Deteriorating nylon rollers are causing uneven travel According to DASMA, friction within garage door hardware can develop over time as components wear, which is why lubrication or professional service may be recommended when squeaking persists. Hinge Movement Between Door Panels Repeated opening and closing cycles cause hinge joints and pivot points to experience constant motion, which may eventually produce squeaks between connected garage door components. Noise from hinge movement often develops when: Loose hinges shift between sectional panels Pivot joints begin creating friction during panel bending Fasteners loosen after repeated door cycles Metal hinge plates rub against adjacent metal parts Panel alignment places uneven strain on hinge brackets Ongoing hinge wear can eventually affect panel alignment and door balance, which is why technicians may evaluate the entire system when inspecting hardware movement during garage door installation. Dry Bearings and Lack of Lubrication Bearings located inside rollers, hinges, and other moving parts require lubrication to maintain smooth operation, and friction increases when protective grease gradually wears away. Signs that lubrication loss may be contributing to noise include: Dry roller bearings are producing a grinding sound Aging grease no longer protects metal contact surfaces Lack of regular lubrication during garage door maintenance Dust mixing with old lubricant around hardware Friction is building along rotating metal components Service professionals often apply white lithium grease or a silicone spray because the right lubricant reduces friction across moving hardware and improves long-term performance of garage door systems. Loose Hardware and Mounting Brackets Constant vibration during opening and closing cycles may slowly loosen bolts and mounting brackets, allowing certain garage door parts to shift slightly during operation. Situations that commonly produce noise include: Rail brackets are loosening near the opener assembly Track mounting bolts are backing out over time Hinges requiring tightening with a socket wrench Panel fasteners are shifting under repeated movement Hardware vibration is affecting the door’s balance Ongoing vibration or bracket shifting may signal broader system wear, and technicians sometimes assess overall hardware condition when recommending garage door replacement for aging systems. Track Surface Friction Along the Door Path Metal tracks guide rollers during every opening cycle, and friction inside the channel can create a noisy garage door when surfaces become rough or obstructed. Situations that may contribute to track-related noise include: Dirt buildup is collecting along the inner track walls Rollers scraping against uneven metal surfaces Debris trapped within sections of the track Roller wheels are drifting slightly out of alignment Friction forming, where the garage door rollers contact the track Clopay notes that debris buildup or track misalignment can disrupt roller travel and increase friction along the track path, often contributing to a noisy garage door during operation. Environmental Conditions Affecting Metal Components Environmental exposure gradually influences how metal components inside a garage door system perform, particularly in coastal regions like San Diego. Factors that often contribute to squeaking include: High humidity is affecting exposed hardware surfaces Salt air is accelerating corrosion on garage door components Temperature shifts influencing metal expansion Moisture buildup around hinges and springs Dust particles settling on moving hardware Environmental wear can slowly affect multiple mechanical parts of the system and contribute to long-term garage door squeaking. Spring System Tension Changes Springs support the heavy lifting required to raise a garage door, and small changes in tension can sometimes introduce vibration or noise into the system. Indicators that spring movement may be influencing sound include: Garage door springs are losing lubrication along the coils Changes in spring tension affect balance Friction is developing near the torsion shaft bearing plates Movement within high-stress spring anchor points Aging extension springs produce vibration during operation Because torsion and extension springs counterbalance the door’s weight during opening and closing, Clopay indicates that changes in spring tension can affect how smoothly the door moves and may introduce vibration or noise into the system. Common Signs of Garage Door Squeaking When Opening Noise during operation often develops gradually as friction increases between garage door components, making it easier to recognize early warning signs before the system develops more serious mechanical issues.
Where to Lubricate a Squeaking Garage Door
A garage door makes noise when certain mechanical components begin operating without sufficient lubrication. Identifying where lubrication normally applies helps explain how garage door squeaking develops and why certain sections of the door system generate sound. When friction builds up in hinges, rollers, or springs, the door may begin to squeak during normal cycles. In many situations, homeowners also begin exploring whether a garage door repair is needed when the noise persists or worn hardware is involved. Why Does a Garage Door Squeak Over Time? Garage door systems rely on mechanical components that move during every opening and closing cycle, and as lubrication wears down over time, friction develops between metal parts, which is why homeowners often begin noticing garage door squeaking. Common conditions that contribute to these noise patterns include: Frequent door cycles that gradually wear down lubrication around garage door parts and pivot points. Environmental exposure, such as high humidity, may affect metal surfaces and increase friction. Dust buildup along track walls and surrounding components interferes with smooth movement. Aging hardware, including garage door springs and hinges, experiences greater friction over time. Loose hinges or worn hardware that allow vibration as the door moves. To understand how these friction conditions develop within the garage door system, read our guide on How to Stop a Garage Door From Squeaking, which explains the common reasons homeowners hear squeaking during door operation. Where to Lubricate a Garage Door to Reduce Garage Door Squeaks Torsion Spring Coils Above the Garage Door Garage door springs operate under high tension while supporting the door’s weight, and lubrication along the spring coils helps reduce friction that can contribute to garage door squeaking during opening cycles. Spring lubrication is typically performed through actions like: Position the garage door closed to keep the springs stable during maintenance. Wipe away dust or buildup from the spring surface using a damp cloth before applying lubricant. Apply a light coating of silicone spray along the full length of the spring coils. Allow the lubricant to spread between the coils as the spring expands and contracts. Cycle the garage door several times so the lubricant distributes evenly across the metal parts. Lubrication along torsion spring coils helps reduce friction and noise during door movement, and Clopay notes that applying a thin layer of silicone-based lubricant and cycling the door helps distribute lubrication across the springs. End Bearing Plates Along the Torsion Shaft End bearing plates support the torsion shaft, which rotates when the garage door opens, making lubrication of the bearing assembly important for smooth mechanical operation. Bearing plate lubrication usually follows a process that includes: Inspect the bearing plate area to locate the ball bearings supporting the torsion shaft. Remove debris or dust that may interfere with the bearing assembly. Direct a small amount of spray lubricant toward the ball bearings within the plate. Allow the lubricant to reach the point where the torsion shaft passes through the bearing plate. Operate the garage door briefly to allow lubrication to spread through the rotating components. Rotation within these bearing plates supports the torsion system during door movement, and worn bearings or hardware around the shaft may eventually require garage door spring repair to restore smooth lifting performance. Hinge Pivot Points Between Door Panels Garage door panels connect through hinge brackets that allow the door to bend as it travels along the track system, and lubrication at hinge pivot points helps reduce friction between metal components. Maintaining hinge lubrication normally requires steps such as: Inspect each hinge along the door panels to identify pivot points that rotate during movement. Remove dirt or buildup around hinge brackets before applying lubricant. Apply spray lubricant directly onto the hinge pivot joints. Allow the lubricant to penetrate the spaces between the metal components in the hinge assembly. Move the garage door through a full cycle to spread lubrication along the hinge system. Movement between connected panels creates repeated metal-to-metal contact, so worn hinge hardware or loose brackets may prompt homeowners to schedule garage door installation as panel alignment and structural integrity decline. Roller Bearings Inside the Track System Garage door rollers guide the door along the track system during opening and closing cycles, and proper lubrication of the roller bearings helps reduce friction and support smoother door travel. Roller lubrication commonly takes place through the following sequence: Locate each roller positioned along the hinges and track system. Wipe away dust buildup along the roller stem and surrounding areas. Apply spray lubricant directly to the roller bearings inside nylon rollers or steel rollers. Allow the lubricant to penetrate the axle where the roller connects to the hinge bracket. Move the door several times to spread the lubricant across the roller bearings. Clopay explains that keeping garage door rollers properly lubricated reduces friction in the track system, allowing the door to travel more smoothly and quietly as the rollers move along the tracks. Pulley Wheels in Extension Spring Systems Extension springs use pulley wheels to guide lifting cables during garage door operation, and lubrication around these pulleys helps reduce friction that may contribute to garage door squeaking. Pulley maintenance often includes lubrication tasks like: Identify the pulley wheels located near the extension springs. Inspect the pulley assembly to locate the rotating bearings. Apply a small amount of lubricant to the pulley wheel bearings. Allow the lubricant to spread along the groove where the lifting cables travel. Operate the garage door several times to distribute lubricant through the pulley system. Pulley wheels guide lifting cables in extension spring systems, so proper lubrication around the pulley bearings helps reduce friction and support smoother garage door movement. The Opener Arm Connection Point The opener arm connects the garage door opener to the door bracket, transferring motor movement into the door system, where friction can contribute to garage door squeaking during operation. Lubricating the opener arm connection often involves actions such as: Locate the connection point where the opener arm attaches to the door bracket. Inspect pivot joints and fasteners that
What Parts Cause a Garage Door to Squeak?

A garage door operates through several interconnected moving parts that guide the door along the track and support its lifting system. When friction develops within these garage door components, the result can be noticeable garage door squeaking during normal operation. Identifying the specific garage door parts responsible for the noise helps explain how friction forms inside the system. Understanding these mechanical sources also helps determine when a professional garage door repair service may be needed to address worn hardware and restore smoother door movement. Why Do Garage Doors Start Making Squeaking Sounds Over Time? Garage door systems use several connected moving parts to guide the door along the track and support lifting under high tension, and as friction develops between these garage door components, noticeable garage door squeaking may begin during operation. Common conditions that may lead to noise include: Friction develops inside the garage door rollers and their roller bearings during repeated cycles Gradual wear forming at hinge pivot points between door panels Changes in spring tension affect the balance of garage door springs Dust buildup is collecting along the track walls and affecting the door’s movement Reduced regular lubrication on rotating metal components To understand how these friction points are addressed, read our guide on How to Stop a Garage Door From Squeaking, which explains how reducing friction in rollers, hinges, and springs helps restore smoother door operation. Mechanical Parts That Commonly Cause Squeaking Sounds Rollers and Internal Bearings Rollers guide the garage door along the track, and internal ball bearings allow the wheels to rotate smoothly during each cycle, so wear or friction in these parts often causes the garage door to squeak. Noise from roller assemblies often appears when: Bearing friction develops inside aging metal rollers after repeated door cycles Movement along part of the track becomes rough due to debris or surface wear Roller wheels shift slightly against the track walls during opening cycles Aging steel rollers create metal-to-metal contact while rotating Lack of regular lubrication causes bearings to grind instead of rotating smoothly Regular lubrication helps limit friction in rollers and hinges during door movement, and Clopay reiterates that maintaining these components allows the garage door system to operate more quietly and smoothly. Panel Hinges Between Door Sections Panel hinges connect individual door panels and allow them to bend as the door follows the curved track, so friction at the hinge pivot points frequently contributes to a noisy garage door. Noise often develops when hinge movement involves: Gradual loosening of hardware that creates loose hinges during door travel Wear forming at the hinge pivot points after years of repeated cycles Friction develops between connected metal parts during movement Dust is collecting inside hinge joints and affecting motion Reduced proper lubrication along the rotating hinge hardware Hinge movement allows the door panels to bend smoothly along the track, and persistent friction in these joints may eventually signal the need for garage door maintenance to restore smooth operation. Torsion Springs and Spring Mounting Hardware Torsion springs support the heavy lifting required to raise a garage door and operate under high tension, so friction around the springs may create noticeable noise as the system ages. Spring-related noise may appear under conditions such as: Surface friction developing along rotating spring coils Changes in spring tension affecting the system balance Contact between springs and nearby metal components Dust buildup is forming on exposed spring surfaces Reduced lubrication, causing resistance during rotation Friction along high-tension spring coils can create noise during door movement, and Clopay notes that torsion springs work by winding and unwinding to counterbalance the weight of the garage door. Track Surfaces and Roller Contact Points Tracks guide the door’s travel path and maintain alignment while rollers move along the system, so friction developing along the track channel may contribute to ongoing garage door squeaking. Track-related conditions that can increase noise include: Dirt accumulation is building along the interior track walls Roller edges are rubbing against uneven sections of the track Debris settling inside the track channel after extended use Misalignment of the pushing rollers against the metal surface Lack of cleaning that prevents smooth operation Although tracks mainly guide the door’s travel path, ongoing friction between rollers and track metal can gradually lead to a squeaky garage door and may require garage door replacement when track wear or structural damage becomes severe. Bearing Plates and Shaft Supports Bearing plates support the torsion shaft above the door and allow it to rotate smoothly during operation, so wear inside these garage door components may lead to squeaking sounds near the header area. Signs of bearing plate wear may involve: Internal ball bearings are losing smooth rotation over time Friction forming between the shaft hardware and the support brackets Aging bearing plates allow the slight movement of the torsion shaft Increased vibration during lifting cycles Wear develops after years of repeated system operation Rotational strain within bearing plates can affect how the torsion shaft turns during lifting cycles, and severe wear in this area may eventually require replacement of the garage door springs to restore balanced door movement. Opener Drive Systems The garage door opener transfers motion from the motor to the door through drive hardware such as chains, belts, or a screw drive, so friction within these mechanisms can sometimes add to overall system noise. Drive-system noise may occur when: Chain or belt assemblies develop vibration during operation Wear forms along the opener rail connected to the drive mechanism Friction builds within a rotating screw drive shaft Motor strain increases as mechanical resistance develops Aging opener hardware begins producing vibration sounds Drive hardware moves the door through a trolley that travels along the opener rail, and the Chamberlain Group explains that chain, belt, and screw drive systems power this motion, which may create vibration or noise if components develop friction. Environmental Factors That Can Contribute to Garage Door Squeaks Environmental conditions can increase friction between moving garage door components, allowing garage door squeaking to develop as moisture, debris,
How to Stop a Garage Door From Squeaking
Garage door squeaking is one of the most common noise issues homeowners notice during daily garage door use. The sound often develops when moving parts such as rollers, hinges, or springs begin to lose lubrication or show signs of wear. In many cases, simple maintenance can reduce the noise and restore smoother door movement. However, persistent squeaks may signal the need for garage door repair to prevent costly mechanical problems and keep the system working efficiently. When Does Garage Door Squeaking Usually Start? Garage door squeaking often occurs during regular opening and closing cycles when friction develops between moving parts or environmental conditions begin to affect metal components in the system. Situations where homeowners commonly notice the noise include: Garage door squeaking when opening after long periods of inactivity. Noise develops during the first morning cycle when metal components contract overnight. Squeaks appear near rollers or hinges as the door travels along the track. Sound increases over time as lubrication gradually wears away. Intermittent squeaks during the door’s movement are becoming more noticeable over time. To learn why these noises commonly develop in local homes, read our guide on Why Is My Garage Door Squeaking in San Diego?, which explains the environmental and mechanical factors that often lead to persistent garage door squeaking. Common Causes of Garage Door Squeaks Several mechanical and environmental factors can create friction within the system, leading to squeaking in the garage door during normal operation. Common causes of garage door squeaking include: Dry rollers and bearings that lose lubrication over time, increasing friction around garage door rollers and ball bearings during movement Hinges and pivot points are gradually wearing down as metal components rub together during repeated opening and closing cycles Loose hardware and brackets are developing from constant vibration as bolts and fasteners slowly shift out of position Dust or debris accumulating along the tracks and track walls, which interferes with smooth roller movement Environmental conditions, such as high humidity or temperature changes, affect metal parts and increase friction Recognizing these common causes helps homeowners address garage door squeaking early and maintain smoother, quieter operation. Steps on How to Fix Squeaking Garage Door Step 1: Inspect Rollers and Hinges for Friction Friction around rollers and hinges is one of the earliest sources of garage door squeaking, especially after repeated door cycles gradually reduce lubrication and allow hardware to loosen. Indicators that friction may be developing include: Roller movement sounds rough as garage door rollers travel along the track walls. Hinges between panels are shifting slightly due to loose hinges or worn fasteners. Metal rollers produce louder sounds than nylon rollers as they contact the track. Roller assemblies showing wear around ball bearings that support smooth rotation. Small vibrations are forming near connecting brackets as garage door parts begin to loosen. According to Clopay, squeaking and creaking noises often develop when rollers, hinges, or other moving parts lose lubrication or begin to wear, making regular inspection important for reducing garage door squeaking and maintaining smooth operation. Step 2: Apply Lubrication to Moving Hardware Friction between moving parts is one of the most common causes of garage door squeaking, which is why proper lubrication helps restore quieter operation and improve long-term maintenance. Key hardware areas that benefit from lubrication include: Garage door springs and extension springs experience constant tension during operation. Rotating pivot points along hinges and support brackets that guide the door panels. Internal ball bearings inside rollers that allow a smooth rolling motion. Contact areas around bearing plates supporting torsion systems. Hinges and metal components connecting the garage door panels. To identify where to apply lubrication to reduce friction and quiet the system, read our guide on Where to Lubricate a Squeaking Garage Door, which explains the key hardware areas that benefit most from proper lubrication. Step 3: Tighten Loose Hardware and Fasteners Repeated garage door operation creates constant vibration that can gradually loosen bolts, brackets, and fasteners, allowing components to shift slightly and increase friction within the system. Hardware points that should be checked periodically include: Fasteners that secure hinges connecting multiple garage door components. Bolts anchoring the track assembly to the wall structure. Mounting hardware supporting the garage door opener mechanism. Support brackets are attached near bearing plates and roller brackets. Structural bolts that keep the door panels aligned during operation. Loose brackets and fasteners often create vibration that spreads through the system, which is why consistent garage door maintenance helps keep hardware aligned and prevents recurring noise issues. Step 4: Clean Dust and Debris From Tracks Dust, dirt, and debris inside the track channel can disrupt roller movement and increase friction along the track walls, often contributing to noise during garage door opening and closing cycles. Cleaning the track system may involve: Wiping track surfaces with a damp cloth to remove dirt and residue. Removing debris lodged along the track walls where rollers travel. Inspecting each part of the track for buildup affecting roller motion. Clearing cobwebs or dust near hinges and brackets. Ensuring the track channel remains free of obstructions. Clopay recommends inspecting rollers and hinges and cleaning off stubborn grime or old lubricant with a cloth and automotive brake cleaner before applying fresh lubricant to help maintain smoother garage door movement. Step 5: Check for Worn or Damaged Parts Ongoing garage door squeaking can indicate worn components that no longer move smoothly, suggesting that certain parts may need repair or replacement to restore consistent operation. Common wear points that deserve attention include: Aging garage door rollers that no longer rotate smoothly. Hinges showing excessive play around connection points. Steel rollers with worn internal roller bearings. Springs are experiencing reduced tension due to years of use. Support hardware near torsion systems exposed to high tension forces. To learn which garage door components commonly create squeaking noises, read our guide on What Parts Cause a Garage Door to Squeak?, which explains the parts that often produce friction during operation. Signs Your Door May Need Garage Door Squeak Repair Certain warning
What Causes a Garage Door to Reverse Before Closing?
A garage door that starts to close, then suddenly reverses and goes back up, can be frustrating. In many cases, the issue is not random. Modern garage doors are designed with built-in safety systems that force the door to reverse if something interferes with its closing cycle. In San Diego, environmental factors like coastal salt air, dust, debris from Santa Ana winds, and year-round temperature changes can speed up wear on garage door components. When even one part stops working properly, the opener may detect resistance and automatically reverse. These same issues can affect larger systems as well, making commercial garage door repair equally important for warehouses, storefronts, and industrial properties that rely on consistent operation. Understanding the most common causes can help identify what to check and when professional garage door service may be necessary. Why Does a Garage Door Start to Close and Then Go Back Up? A garage door usually reverses before closing because the opener detects resistance or an object in its path. The most common causes include misaligned safety sensors, blocked tracks, incorrect travel limit settings, worn springs, or excessive friction from damaged rollers. This automatic reversal feature is designed to prevent injury and property damage. If the door does not close properly, it is often a sign that a component needs inspection or adjustment. For a deeper look at related closing issues, read Why Your Garage Door Won’t Close All the Way (Common Causes and Safe Next Steps) to better understand additional warning signs and practical next steps. Misaligned or Blocked Safety Sensors One of the most common reasons a garage door reverses is an issue with the garage door safety sensors, also known as photo eye sensors. How Safety Sensors Work These small sensors are located near the bottom of the garage door tracks. They send an invisible beam across the opening. If that beam is interrupted, the door will not close. Common Problems in San Diego Dust buildup Spider webs Salt air corrosion Sunlight glare Slight misalignment from accidental bumps If one sensor light is blinking, it often indicates misalignment. What to Check Make sure both sensors are clean Confirm nothing is blocking the beam Look for loose brackets Avoid forcing the door closed, as this can strain the opener motor. When to Call a Professional If cleaning does not resolve the issue or the sensors repeatedly lose alignment, a technician may need to inspect wiring or reposition the brackets. A basic sensor adjustment typically falls within an average service visit range. For more insight into persistent closing problems, read Why Won’t My Garage Door Close All the Way? to better understand what could be preventing a complete and secure close. Obstructions in the Garage Door Tracks Even small debris inside the tracks can trigger a reversal. Common Track Obstructions Small rocks Leaves Rust flakes Loose hardware Homes closer to the coast may experience corrosion buildup inside tracks, increasing resistance. Why This Causes Reversal If the rollers cannot move smoothly, the opener senses extra force and reverses the door to prevent damage. What to Check Visually inspect both tracks for debris or visible dents. If tracks appear bent or misaligned, professional realignment may be required. To better understand how sensor positioning affects door performance, read Can Misaligned Sensors Stop a Garage Door From Closing? for a deeper explanation of this common issue. Incorrect Travel Limit Settings on the Opener The opener uses travel limit settings to determine how far the door should close. What Happens When Limits Are Incorrect If the down limit is set too short, the door may think it has hit the ground too early. It will then reverse before fully sealing. Signs of Travel Limit Problems The door touches the ground and reverses Door stops slightly above the floor Reversal happens at the same point each time Improper adjustments can create additional issues. Professional recalibration ensures the door closes fully without overloading the motor. Excessive Closing Force or Sensitivity Settings Garage door openers are designed to detect resistance. If the force setting is too sensitive, the door may reverse even when no obstruction exists. Why This Happens Increased resistance can come from: Humidity swelling Worn rollers Track friction Aging hardware San Diego’s coastal air can gradually increase friction in moving components. Safety Note Force adjustments should be handled carefully. Setting the force too high can disable an important safety feature. If resistance continues, a technician should inspect for underlying mechanical issues. Worn or Broken Garage Door Springs Garage door springs carry most of the door’s weight. When a torsion spring or extension spring weakens, the system becomes unbalanced. Signs of Spring Problems The door feels heavy Door jerks during movement One side closes faster than the other Loud snapping sound Why It Causes Reversal If the opener senses uneven tension or added strain, it may reverse to prevent motor burnout. Important Safety Warning Spring repair is not a DIY task. These components are under high tension and can cause serious injury. Coastal corrosion in San Diego can shorten spring lifespan, especially within a few miles of the ocean. Professional spring replacement restores balance and safe operation. Damaged or Worn Rollers Rollers guide the door along the tracks. When rollers wear down, crack, or rust, friction increases. Common Symptoms Grinding noise Door shaking Uneven movement Slower closing speed Prevention Tips Lubricate rollers every 3 to 6 months Schedule annual maintenance Replace aging metal rollers with quieter nylon options when recommended Excessive friction can cause the opener to detect resistance and reverse. Warped or Damaged Garage Door Panels Garage door panels can warp due to: Prolonged sun exposure Moisture Impact damage In San Diego, constant sunlight and seasonal temperature shifts can slowly affect door alignment. If panels bend slightly, the door may bind inside the tracks. Even minor structural resistance can trigger reversal. Visible panel cracks or gaps should be evaluated before the damage spreads to hinges and tracks. Electrical or Circuit